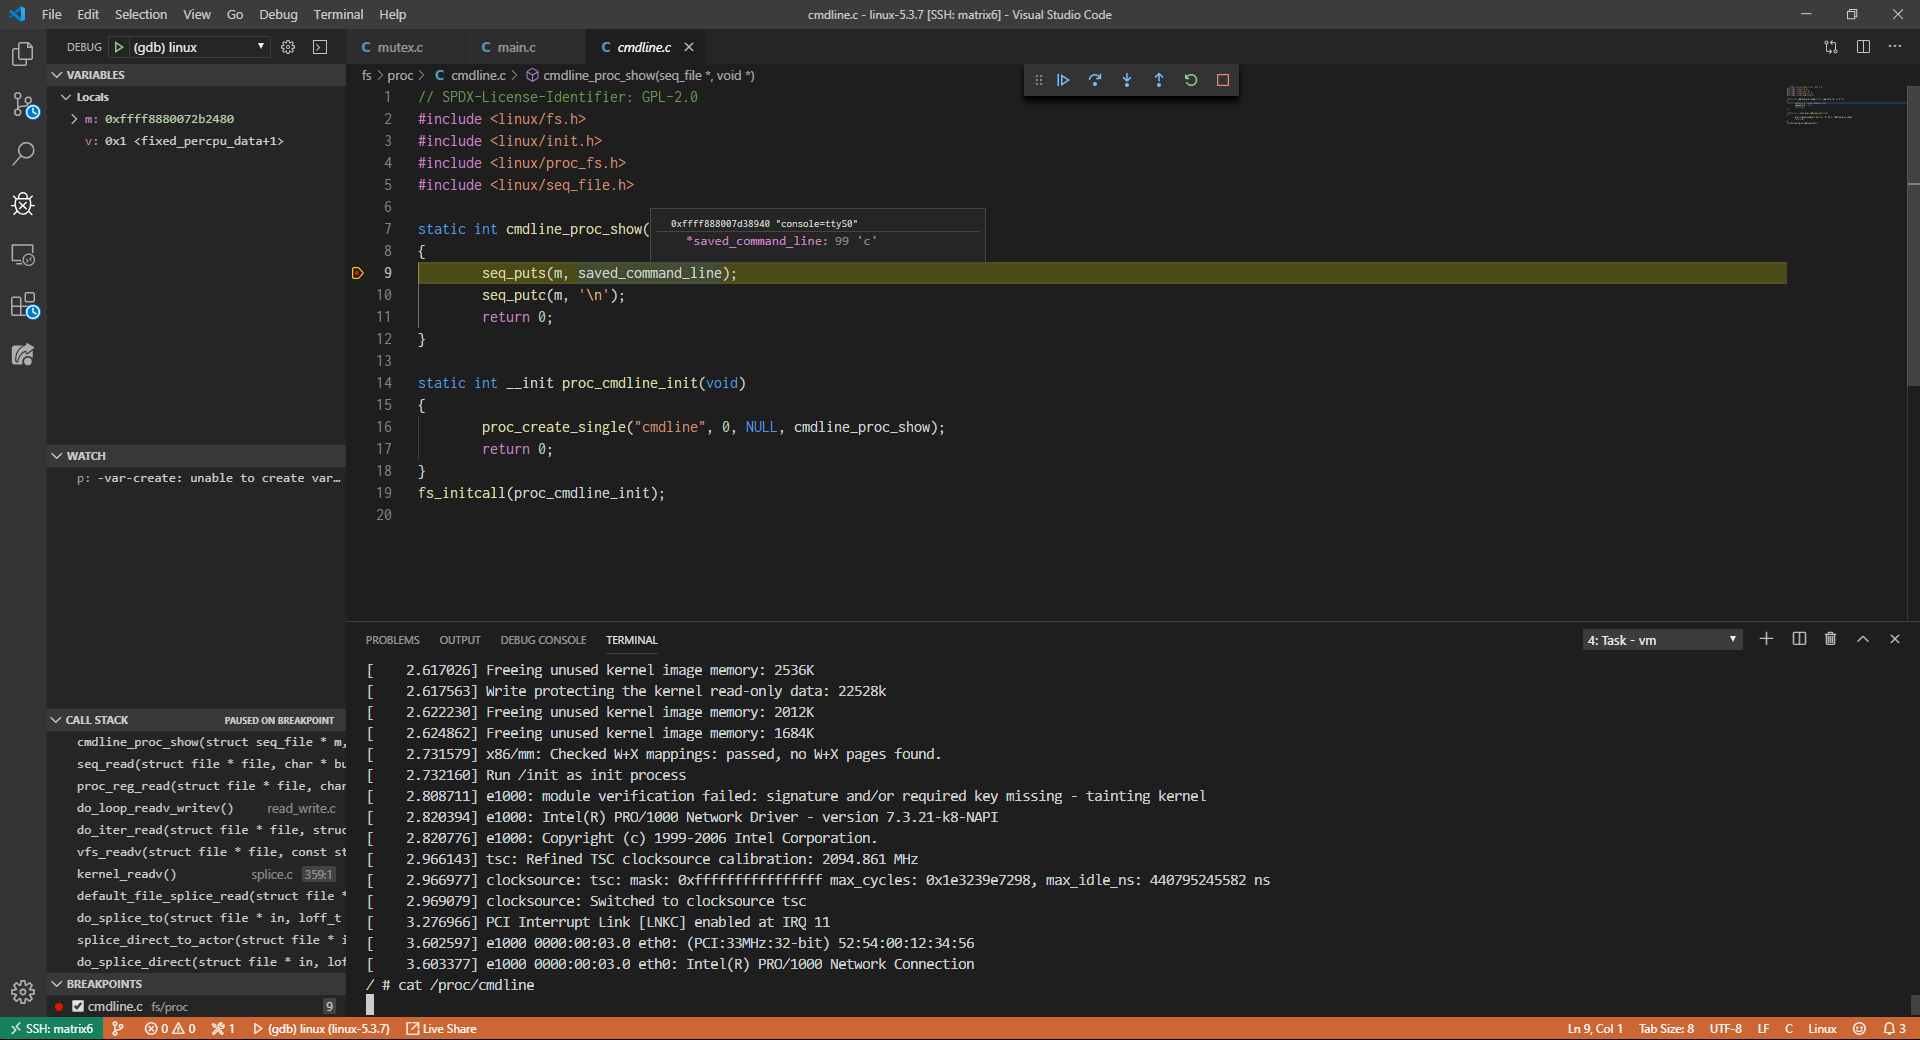
编译调试版 Linux 内核 首先下载源代码:
1 wget https://cdn.kernel.org/pub/linux/kernel/v5.x/linux-5.3.7.tar.gz
具体下载哪个版本可以自己选择。
然后解压缩源代码,这里假设解压到了 ~/linux-5.3.7。
然后安装编译依赖:
Ubuntu 1 sudo apt-get install build-essential libncurses-dev bison flex libssl-dev libelf-dev
CentOS 1 2 sudo yum group install "Development Tools" sudo yum install ncurses-devel bison flex elfutils-libelf-devel openssl-devel
Fedora 1 2 sudo dnf group install "Development Tools" sudo dnf install ncurses-devel bison flex elfutils-libelf-devel openssl-devel
进入源码目录,配置编译选项:
1 2 cd ~/linux-5.3.7make menuconfig
注意:如果你想用这个内核替换掉自己系统上的内核,要用 /boot/config-$(uname -r) 作为基础配置文件。可以使用 cp /boot/config-$(uname -r) .config 将已有的配置文件拷贝到编译目录中,然后再运行 make menuconfig。
比较重要的配置项有:
1 2 3 4 5 Kernel hacking ---> [*] Kernel debugging Compile-time checks and compiler options ---> [*] Compile the kernel with debug info [*] Provide GDB scripts for kernel debugging
一定要打开。
还有下面的选项会导致打断点失败,一定要关闭:
1 2 Processor type and features ----> [] Randomize the address of the kernel image (KASLR)
保存并退出 menuconfig,开始编译之旅:
编译内核会花掉大概 20GB 的硬盘空间,而且一般需要几十分钟来编译,所以请保证有充足的硬盘空间还有时间。
编译的时候你可以抽空安装一下 qemu:
1 sudo apt install qemu qemu-system qemu-kvm
直接替换已有内核 如果希望快速替换掉现有系统内核,可以使用 make deb-pkg 打包成 .deb 包,然后使用 dpkg 将 .deb 包安装到现有系统中,这样就无需自己准备工具链。例如,我们可以先使用网上下载的 Ubuntu 20.04 等系统安装到虚拟机里,然后安装我们自己打包的内核。
1 2 3 4 make deb-pkg ls ../*.deb../linux-headers-5.3.7_5.3.7-2_amd64.deb ../linux-image-5.3.7-dbg_5.3.7-2_amd64.deb ../linux-image-5.3.7_5.3.7-2_amd64.deb ../linux-libc-dev_5.3.7-2_amd64.deb
制作 initramfs 在虚拟机中启动基本系统 下面介绍下如何仅启动基本的系统。
内核启动的时候非常矛盾, boot loader 加载完内核文件 vmlinuz 后,内核紧接着需要挂载磁盘根文件系统,但如果此时内核没有相应驱动,无法识别磁盘,就需要先加载驱动,而驱动又位于 /lib/modules,得挂载根文件系统才能读取,这就陷入了一个两难境地,系统无法顺利启动。于是有了 initramfs 根文件系统,其中包含必要的设备驱动和工具,boot loader加载 initramfs 到内存中,内核会将其挂载到根目录 /,然后运行 /init 脚本,挂载真正的磁盘根文件系统。
这里借助 BusyBox 构建极简 initramfs,提供基本的用户态可执行程序。
下载 busybox 源代码,解压,假设解压到 ~/busybox-1.31.0,解压完成后,跟内核一样先配置编译选项:
1 2 cd ~/busybox-1.31.0make menuconfig
记得要编译成静态链接的:
1 2 Settings ---> [*] Build static binary (no shared libs)
然后编译,并且安装到 _install 目录:
1 make -j$(nproc ) && make install
之后制作 initramfs 镜像,需要注意的是里面不包含内核模块,如果需要启用内核模块,则需要手动将 .ko 文件拷贝到 lib/modules 目录里,然后在 init 脚本中 insmod:
1 2 3 4 5 6 7 8 9 10 11 12 13 mkdir initramfscd initramfscp ../_install/* -rf ./mkdir dev proc sysmkdir -p lib/modulesmkdir -p etc/init.dtouch etc/init.d/rcSchmod a+x etc/init.d/rcSsudo cp -a /dev/{null,console,tty ,tty1,tty2,tty3,tty4} dev/cp ~/linux-5.3.7/drivers/net/ethernet/intel/e1000/e1000.ko lib/modulesrm linuxrcvim init chmod a+x init
init 文件内容如下:
1 2 3 4 5 6 7 #!/bin/sh mount -t proc none /proc mount -t sysfs none /sys insmod /lib/modules/e1000.ko /sbin/mdev -s setsid cttyhack /bin/sh exec /sbin/init
最后打包initramfs:
1 find . -print0 | cpio --null -ov --format=newc | gzip -9 > ../initramfs.cpio.gz
启动内核并调试 执行:
1 qemu-system-x86_64 -s -S -kernel ~/linux-5.3.7/arch/x86/boot/bzImage -initrd ~/busybox-1.31.0/initramfs.cpio.gz -nographic -append "console=ttyS0" -serial mon:stdio -device e1000,netdev=net0 -netdev user,id =net0,hostfwd=tcp::5555-:22
启动内核以及 GDB Server,其中 -s 选项是 -gdb 的简写,会在本地的 :1234 启动一个 GDB 服务,然后 -S 代表暂停虚拟机,等待 GDB 执行 continue 指令。append 后面是内核的启动选项。
然后切换到内核源码目录,启动 gdb,不过在启动之前,请向 ~/linux-5.3.7/.gdbinit 添加如下内容:
1 add-auto-load-safe-path ./scripts/gdb/vmlinux-gdb.py
来加载内核调试工具,然后执行:
1 2 3 cd ~/linux-5.3.7gdb vmlinux (gdb) target remote :1234
来连接到虚拟机上的 gdb 服务。
到这里,你就可以像调试普通程序一样调试 Linux 内核了。Linux 的内核入口函数是位于 init/main.c 中的 start_kernel ,在这里完成各种内核数据结构的初始化。但是这已经是 bootstrap 很后面的过程了。要想看真正的第一行代码,请到 arch/x86/boot/header.S
可以通过下面的命令来看看内核调试工具:
1 2 3 4 5 6 7 8 9 10 11 12 13 14 15 16 17 18 19 20 21 22 23 24 25 26 27 28 29 30 31 32 33 34 35 (gdb) apropos lx function lx_clk_core_lookup -- Find struct clk_core by namefunction lx_current -- Return current taskfunction lx_device_find_by_bus_name -- Find struct device by bus and name (both strings)function lx_device_find_by_class_name -- Find struct device by class and name (both strings)function lx_module -- Find module by name and return the module variablefunction lx_per_cpu -- Return per-cpu variablefunction lx_rb_first -- Lookup and return a node from an RBTreefunction lx_rb_last -- Lookup and return a node from an RBTreefunction lx_rb_next -- Lookup and return a node from an RBTreefunction lx_rb_prev -- Lookup and return a node from an RBTreefunction lx_task_by_pid -- Find Linux task by PID and return the task_struct variablefunction lx_thread_info -- Calculate Linux thread_info from task variablefunction lx_thread_info_by_pid -- Calculate Linux thread_info from task variable found by pidlx-clk-summary -- Print clk tree summary lx-cmdline -- Report the Linux Commandline used in the current kernel lx-configdump -- Output kernel config to the filename specified as the command lx-cpus -- List CPU status arrays lx-device-list-bus -- Print devices on a bus (or all buses if not specified) lx-device-list-class -- Print devices in a class (or all classes if not specified) lx-device-list-tree -- Print a device and its children recursively lx-dmesg -- Print Linux kernel log buffer lx-fdtdump -- Output Flattened Device Tree header and dump FDT blob to the filename lx-genpd-summary -- Print genpd summary lx-iomem -- Identify the IO memory resource locations defined by the kernel lx-ioports -- Identify the IO port resource locations defined by the kernel lx-list-check -- Verify a list consistency lx-lsmod -- List currently loaded modules lx-mounts -- Report the VFS mounts of the current process namespace lx-ps -- Dump Linux tasks lx-symbols -- (Re-)load symbols of Linux kernel and currently loaded modules lx-timerlist -- Print /proc/timer_list lx-version -- Report the Linux Version of the current kernel (gdb) lx-cmdline console=ttyS0
我们试下打下断点:
1 2 3 4 5 6 7 8 9 10 11 12 13 14 15 16 17 18 19 20 21 22 23 24 25 26 27 28 29 30 31 32 33 34 35 36 37 38 39 40 41 42 43 44 (gdb) break cmdline_proc_show Breakpoint 1 at 0xffffffff81353110: file fs/proc/cmdline.c, line 8. (gdb) continue Continuing. Breakpoint 1, cmdline_proc_show (m=0xffff8880076ebb80, v=0x1 <fixed_percpu_data+1>) at fs/proc/cmdline.c:8 8 { (gdb) n 9 seq_puts(m, saved_command_line); (gdb) bt at fs/seq_file.c:229 ppos=<optimized out>) at fs/proc/inode.c:223 iter=<optimized out>, filp=<optimized out>) at fs/read_write.c:714 filp=<optimized out>) at fs/read_write.c:701 at fs/read_write.c:935 pos=0xffffc900001f3bf0, flags=0) at fs/read_write.c:997 file=<optimized out>) at fs/splice.c:359 flags=<optimized out>) at fs/splice.c:414 len=<optimized out>, flags=0) at fs/splice.c:877 at fs/splice.c:954 opos=<optimized out>, len=<optimized out>, flags=<optimized out>) at fs/splice.c:1063 count=<optimized out>, max=<optimized out>) at fs/read_write.c:1464 out_fd=<optimized out>) at fs/read_write.c:1525 at fs/read_write.c:1511 (gdb)
在执行 continue 之后,到 qemu 中执行 cat /proc/cmdline ,就可以看到断点被触发了。这时候可以进行堆栈打印,或者是其他操作。不过,神奇的是,内核强制打开了 -O2 选项编译,而且不能关闭,因为有很多代码依赖 -O2 优化特性!所以,你会看到很多变量的值被优化掉了。。
gdb 中调用函数的方法是 $func_name(params)
设置变量的方法是 set $var = xxx:
1 2 3 4 5 6 7 (gdb) p $lx \_current().pid$1 = 176 (gdb) set $next =$lx_per_cpu ("hrtimer_bases" ).clock_base[0].active.next (gdb) p *$container \_of($next , "struct hrtimer" , "node" ) $3 = {node = {node = {__rb_parent_color = 18446612682195984864, rb_right = 0x0 <fixed_percpu_data>, rb_left = 0x0 <fixed_percpu_data>}, expires = 9316000000}, _softexpires = 9316000000, function = 0xffffffff8112f4f0 <tick_sched_timer>, base = 0xffff88800781da80, state = 1 '01' , is_rel = 0 '00' , is_soft = 0 '00' }
配置 VSCode 由于 Linux 内核高度定制化,所以没有办法直接通过配置 includePath 等让 Intellisense 正常提示,这里借助一个 Python 脚本来生成 compile_commands.json 文件帮助 Intellisense 正常提示(包括头文件和宏定义等)
1 2 3 4 5 6 7 8 9 10 11 12 13 14 15 16 17 18 19 20 21 22 23 24 25 26 27 28 29 30 31 32 33 34 35 36 37 38 39 40 41 42 43 44 45 46 47 48 49 50 51 52 53 54 55 56 57 58 59 60 61 62 63 64 65 66 67 68 69 from __future__ import print_function, division import fnmatchimport jsonimport mathimport multiprocessingimport osimport reimport sys CMD_VAR_RE = re.compile (r'^\s*cmd_(\S+)\s*:=\s*(.+)\s*$' , re.MULTILINE) SOURCE_VAR_RE = re.compile (r'^\s*source_(\S+)\s*:=\s*(.+)\s*$' , re.MULTILINE) directory = os.path.abspath(os.getcwd()) def print_progress_bar (progress ): progress_bar = '[' + '|' * int (50 * progress) + '-' * int (50 * (1.0 - progress)) + ']' print ('\r' , progress_bar, "{0:.1%}" .format (progress), end='\r' , file=sys.stderr) def parse_cmd_file (cmdfile_path ): with open (cmdfile_path, 'r' ) as cmdfile: cmdfile_content = cmdfile.read() commands = { match .group(1 ): match .group(2 ) for match in CMD_VAR_RE.finditer(cmdfile_content) } sources = { match .group(1 ): match .group(2 ) for match in SOURCE_VAR_RE.finditer(cmdfile_content) } return [{ 'directory' : directory, 'command' : commands[o_file_name], 'file' : source, 'output' : o_file_name } for o_file_name, source in sources.items()] def main (): print ("Building *.o.cmd file list..." , file=sys.stderr) cmd_files = [] for cur_dir, subdir, files in os.walk(directory): cmd_files.extend(os.path.join(cur_dir, cmdfile_name) for cmdfile_name in fnmatch.filter (files, '*.o.cmd' )) print ("Parsing *.o.cmd files..." , file=sys.stderr) n_processed = 0 print_progress_bar(0 ) compdb = [] pool = multiprocessing.Pool() try : for compdb_chunk in pool.imap_unordered(parse_cmd_file, cmd_files, chunksize=int (math.sqrt(len (cmd_files)))): compdb.extend(compdb_chunk) n_processed += 1 print_progress_bar(n_processed / len (cmd_files)) finally : pool.terminate() pool.join() print (file=sys.stderr) print ("Writing compile_commands.json..." , file=sys.stderr) with open ('compile_commands.json' , 'w' ) as compdb_file: json.dump(compdb, compdb_file, indent=1 ) if __name__ == '__main__' : main()
将这个 Python 脚本保存成 gen_commands.py 之后在 Linux 源代码目录下直接运行就可以生成 compile_commands.json 了。
最后分别配置 VSCode 配置文件:
.vscode/c_cpp_properties.json 1 2 3 4 5 6 7 8 9 10 11 { "configurations" : [ { "name" : "Linux" , "cStandard" : "c11" , "intelliSenseMode" : "gcc-x64" , "compileCommands" : "${workspaceFolder}/compile_commands.json" } ], "version" : 4 }
.vscode/tasks.json 1 2 3 4 5 6 7 8 9 10 11 12 13 14 15 16 17 18 19 20 21 22 23 24 25 26 27 28 29 30 31 32 33 34 35 36 37 38 39 40 41 42 43 44 45 46 47 48 { "version" : "2.0.0" , "tasks" : [ { "label" : "vm" , "type" : "shell" , "command" : "qemu-system-x86_64 -s -S -kernel ~/linux-5.3.7/arch/x86/boot/bzImage -initrd ~/busybox-1.31.0/initramfs.cpio.gz -nographic -append " console =ttyS0" -serial mon:stdio -device e1000,netdev=net0 -netdev user,id=net0,hostfwd=tcp::5555-:22" , "presentation" : { "echo" : true , "clear" : true , "group" : "vm" }, "isBackground" : true , "problemMatcher" : [ { "pattern" : [ { "regexp" : "." , "file" : 1 , "location" : 2 , "message" : 3 } ], "background" : { "activeOnStart" : true , "beginsPattern" : "." , "endsPattern" : "." , } } ] }, { "label" : "build" , "type" : "shell" , "command" : "make" , "group" : { "kind" : "build" , "isDefault" : true }, "presentation" : { "echo" : false , "group" : "build" } } ] }
.vscode/launch.json 1 2 3 4 5 6 7 8 9 10 11 12 13 14 15 16 17 18 19 20 21 22 23 24 25 26 27 28 29 30 31 32 33 34 35 36 37 38 39 40 41 42 { "version" : "0.2.0" , "configurations" : [ { "name" : "(gdb) linux" , "type" : "cppdbg" , "request" : "launch" , "preLaunchTask" : "vm" , "program" : "${workspaceRoot}/vmlinux" , "miDebuggerServerAddress" : "localhost:1234" , "args" : [], "stopAtEntry" : true , "cwd" : "${workspaceFolder}" , "environment" : [], "externalConsole" : false , "MIMode" : "gdb" , "miDebuggerArgs" : "-n" , "targetArchitecture" : "x64" , "setupCommands" : [ { "text" : "set arch i386:x86-64:intel" , "ignoreFailures" : false }, { "text" : "dir ." , "ignoreFailures" : false }, { "text" : "add-auto-load-safe-path ./" , "ignoreFailures" : false }, { "text" : "-enable-pretty-printing" , "ignoreFailures" : true } ] } ] }
.vscode/settings.json 1 2 3 4 5 6 7 8 9 10 11 12 { "files.exclude" : { "**/.*.*.cmd" : true , "**/.*.d" : true , "**/.*.S" : true }, "[c]" : { "editor.detectIndentation" : false , "editor.tabSize" : 8 , "editor.insertSpaces" : false } }
然后就可以到处打断点,按 F5 开始欢快地调试了~